This post was written by a guest contributor. As such, the advice presented here may or may not conflict with advice I've given in other posts, nor may it reflect my own personal opinions on the subject at hand.
Hello, You can call me Jade! I'm a programmer/game developer and I primarily work in the Unity game engine. I love state machines and I've made more than my fair share of them. In fact I'm relatively well known at this point for turning just about everything into a state machine!
In this guide I'm going to be teaching you about the basics of State Machines and how to get started with them!
Welcome to a madman's guide on the basics of State Machines.
Please be advised that much of this information is geared towards teaching the fundamentals of the State Pattern and State Machines. It does not focus on efficiency, code style or best practices.
Getting Setup
First, if you haven't already done so you should install a version of Unity and your IDE of choice. I recommend Visual Studio or Rider and Unity 2019.4.xx LTS, just to make sure everything works the same as demonstrated below. However editor setup is a bit off out of scope for this guide so check out Unity's documentation if you need any help!
This guide aims to teach you what you need to know to understand the following…
- State Pattern
- State Machines
- Basic State Machine Components
- State Machine Benefits
- How To Get Started Making Them
Alright, let's get started. You've likely heard the terms “State Pattern”, “State Machine”, “FSM” or “Finite Automata” tossed around on forums, or maybe this is your first time hearing it. In either case as you progress in your game development or programming careers you'll stumble across this topic eventually.
Video games are hard to make and programming can objectively be even more difficult. So we programmers tend to build solutions that allow us to do our work faster and easier, or even automate it entirely. Over time these solutions get abstracted and refined so that they can be used across many architectures, languages etc. One of those patterns is the State Pattern and we'll be focusing on an implementation of this pattern!
Introducing, The State Machine
State Machine is a term generally used to refer to Deterministic Finite State Machines, or Deterministic Finite Automaton. There are other types of state machines if you're curious, however in this guide we'll be focusing only on this branch to keep things simple.
If you haven't already figured it out the acronym I mentioned earlier, FSM, stands for Finite State Machines. But what exactly does all that mean? Well the definition of a state machine as provided by Wikipedia is…
An abstract machine that can be in exactly one of a finite number of states at any given time.
So let's take a look at the first part. Wikipedia calls it “An abstract machine”. What this means is that it could theoretically be anything, a physical piece of machinery or maybe some software in your game or app. The point here is our definition changes due to context or implementation!
So then what about the second part of this definition? Let's take a look at it and see what information we can get out of it.
can be in exactly one of a finite number of states at any given time.
This tells us two things, the first being that our “State Machine” can only be in one state at a time which is simple enough. The other means that we can't have an infinite amount of states, there must be some predetermined or determinable number of states provided.
Alright now that we have a bit of a definition of what a state machine is let's take a look at the next important pieces! First on our list is…
...States!
A State is the particular condition that something is in at a given time. If you've done any object oriented programming you've already been working with “State” a lot. Your variables define the object's current state and by modifying those variables you're Transitioning it to a new state.
I think it's time we get started playing with States but first a little information. We'll be building our system using objects in a typical Object Oriented fashion. Each State will be an object that we'll be attaching onto our main object. And each of those objects will define the current state of the main object.
First off you'll need to create two new C# scripts. The first one should be named “Person” and the other “State”. In the “Person” script replace everything with the code below.
using UnityEngine;

namespace MyFirstState
{
    public class Person : MonoBehaviour
    {
        private State currentState;

        private void Start()
        {

        }
    }
}
After that you can replace the code in the State class with the following code.
namespace MyFirstState
{
    public abstract class State
    {
        public string StateName { get; protected set; }
        public abstract void Initialize();
        public abstract void Respond();
    }
}
This code is pretty straight forward, we have a “Person” class which has a “State” object. The “State” object is what we'll be using to define the current state of our Person. This is a simple demonstration of the State Pattern at work in Unity.
So what now? Well now we actually have to give purpose to our state class by creating concrete State classes. So let's go do that now. I'm feeling pretty “Tired” at the moment and a bit “Hungry” so I'm going to create two states that reflect that!
Here's the Tired State.
using UnityEngine;

namespace MyFirstState
{
    public class TiredState : State
    {
        public override void Initialize()
        {
            StateName = "Tired";
        }

        public override void Respond()
        {
            Debug.Log("I'm feeling kind of tired");
        }
    }
}
And here's the Hungry state.
using UnityEngine;

namespace MyFirstState
{
    public class HungryState : State
    {
        public override void Initialize()
        {
            StateName = "Hungry";
        }

        public override void Respond()
        {
            Debug.Log("I'm feeling hungry");
        }
    }
}
Alright now we have some code to work with let's start putting thing's together. What we'll be doing next is getting our person to enter and exit states, and then automating that process!
Now it's time to define a state for our Person. I'm going to start in the Hungry state so let's modify the Start method of the Person class like so…
private void Start()
{
    currentState = new TiredState();
    Debug.Log($"This person's state is now {currentState.StateName}");
}
Now if you head into Unity and hit play you'll notice that in the console we get a nice little message logged! So now we have successfully transitioned into our first state. But hey there's that word again, they're actually pretty important so before we move on let's talk about…
...Transitions!
In this context a transition is the process that occurs when changing from one state to another. Transitions are a simple enough concept but they can make and break most State Machine implementations. let's take a look at an example of a simple transition between our Hungry and Tired State.
To get started with our transitions we'll need to modify our code a little bit, let's head to the Person class and add a list of States. In the start method we'll add an instance of our Tired and Hungry states into this list and initialize them. Our Person class should now look something like this…
namespace MyFirstState
{
    public class Person : MonoBehaviour
    {
        private State currentState;
        private List<State> allStates = new List<State>(8);

        private void Start()
        {
            allStates.Add(new TiredState());
            allStates.Add(new HungryState());
            foreach (var state in allStates)
            {
                state.Initialize();
            }
            currentState = allStates[0];

            Debug.Log($"This person's state is now {currentState.StateName}");
        }
    }
}
Next let's add an Update method so that we can change our state with user input. Inside it we'll put in a check to see if we pressed the left or right mouse button. For now these values will be hardcoded but no worries things will get better.
This is using the old Input System Unity provides, this may not be supported in future versions.
private void Update()
{
    if (Input.GetMouseButtonDown(0))
    {
        currentState = allStates[0];

        Debug.Log(currentState.Respond());
    }
    else if (Input.GetMouseButtonDown(1))
    {
        currentState = allStates[1];

        Debug.Log(currentState.Respond());
    }
}
You'll notice now that while in the playmode in Unity, when you press the left and right mouse button our state changes! A small message will be displayed in the console telling us what state the Person is in.
We've now managed to divide the state of our object and the object itself which means we've (mostly) implemented the State Pattern! However we're not finished yet, It seems things aren't quite as good to go as they seem…
Smoke From The Machine!
This might be a big surprise but there's quite a few issues in this system we've built! The issues are making it almost impossible to scale this solution beyond a few states. So let's list off all the problems with our current implementation and see how we can fix them.
- Can't easily determine which states are which in our collection
- Using if statements for our transitions
- Ability to shift into any state from any state
- States can't be synced with Unity's update loop
Each issue on it's own definitely prevents us from scaling this system and making it more efficient. However when combined together we've basically started a spaghetti factory! These problems are actually relatively trivial to fix however so let's get started.
First thing is first, let's change the type of our collection. We're going to change from a simple List<State> to a Dictionary<Type, State>.
How will this help make things better? Well in our current code all of our states are kind of shoved into a big pile. Wouldn't it be nicer if they were sorted based on the type of each state so we could quickly find the one we want?
Let's wipe everything in our Person class and start fresh. We'll keep the Start and Update method but you can get rid of what's inside them. We'll also change our List to the Dictionary as mentioned before. After adding the appropriate using statements the class should now look something like this:
using System;
using System.Collections.Generic;
using UnityEngine;

namespace MyFirstState
{
    public class Person : MonoBehaviour
    {
        private State currentState;
        private Dictionary<Type, State> allStates = new Dictionary<Type, State>();

        private void Start()
        {

        }
        private void Update()
        {

        }
    }
}
Now that we've changed to a dictionary we need to restructure our thinking a tiny bit. Instead of just transitioning into any state we want, let's only transition into the one's that make sense. In this case we also only want one instance of a particular type of state.
For testing purposes you should create two more States and set them up as we did with the Tired and Hungry states. In my case I added a Sleeping state and an Idle state. Now let's add one more method in our Person class for initializing our States to keep things clean. Then we need to make sure we can call it in Start.
private void Start()
{
    InitializeStates();
}

private void InitializeStates()
{

}
In our Initialize method we need to do the following…
- Create our states
- Fetch their type
- Add the states to the dictionary using the type as key
Now let's take a look at the following code. The comments provided should give you an idea of how this works.
private void InitializeStates()
{
    var idleState = new IdleState(); // Initialize all of our states
    var hungryState = new HungryState();
    var tiredState = new TiredState();
    var sleepingState = new SleepingState();

    // Use the type as the key so we can find them later easier
    allStates.Add(typeof(IdleState), idleState);
    allStates.Add(typeof(HungryState), hungryState);
    allStates.Add(typeof(TiredState), tiredState);
    allStates.Add(typeof(SleepingState), sleepingState);

    // Iterate over all of the states in the dictionary and Initialize them
    foreach (var state in allStates.Values)
    {
        state.Initialize();
    }
}
With this we've now fixed the first issue in our code, let's move onto the second issue…
Fixing The Transitions
So if we recall our issue was…
Using if statements for our transitions
You might be wondering why this is a problem to begin with so let me explain. For each state added we will also likely be adding some transitions to it. With 5 or so states this may be manageable but what about 20? What if we wanted multiple conditions for certain transitions? All the sudden a few simple if/else's could turn into a nightmare to read and debug.
So what are our alternatives? Well one option is to use Switch Statements but while these improve readability, they still suffer the same problem and could end up becoming unmanageable. Which leads us to the solution we'll be using for this guide.
We're going to make our transitions into Objects. This way we can create multiple types of transitions and still have all the same functionality as we would with if statements. But implementing this is a little more complicated than talking about it so let's get into it.
namespace MyFirstState
{
    public abstract class Transition
    {
        public State NextState { get; protected set; }
        public abstract bool ConditionMet();
    }
}
Add a new C# script named Transition and replace the code with what's above. This will be an abstract class with a method that will determine whether or not the condition was met. It will also contain the state we should transition to if the condition is met. Now because I'm a fan of both Lambdas and Delegates I'm going to create another class called DelegateTransition. This will allow me to quickly and easily create conditions for all my transitions.
using System;

namespace MyFirstState
{
    public class DelegateTransition : Transition
    {
        private Func<bool> function; // our function we'll use as our condition

        public DelegateTransition(State nextState, Func<bool> function) // constructor
        {
            NextState = nextState;
            this.function = function;
        }

        // our condition method invokes our function pointer and returns a bool value we can use
        public override bool ConditionMet() => function.Invoke();
    }
}
This DelegateTransition class will inherit from Transition. How it will work may be a little confusing right now but essentially what we'll be doing is passing a condition directly into this transition. When we need to check if this transition should be performed, we'll simply call this delegate and use its return value to determine whether to transition.
Plugging It All Together…
We now have a reusable transition object that we can use for our states. Next we need a way to connect the current state and the transition. This will allow us to quickly check which transitions are valid and only iterate over the ones we need.
To do this we'll once again be using a dictionary. There are other data structures you can use for performance or optimization purposes but we're just here for the basics so we'll put that off for now.
We'll use the type of the current state we're working with as the key and have a list of the transitions as the value. Since the transitions contain the next state we don't need to worry about storing that.
Let's head to our Person class and add the following code below our *allStates *variable. This will be how we store and fetch our transitions in the future!
private Dictionary<Type, List<Transition>> allTransitions = new Dictionary<Type, List<Transition>>();
We've now created a solution to both our second and third problems. We're no longer using if statements for transitions and we've provided a structure to avoid transitioning to any state at will!
But before we celebrate we actually have to plug this code in. Let's add a method to streamline the process of creating new transitions called `AddTransition``.
// transition "from" current "to" next
private void AddTransition(State from, State to, Func<bool> function, int capacity = 2)
{
      // get the type of the current state
      var keyType = from.GetType();

      if (!allTransitions.ContainsKey(keyType))
      {
          // if we haven't entered this transition before,
          // create a new entry and create a list with a default size
          allTransitions.Add(keyType, new List<Transition>(capacity));
      }

      // create our DelegateTransition using the "to" state as our NextState
      var transition = new DelegateTransition(to, function);

      // we no longer need to check if the key exists or the list is null, so add the transition
      allTransitions[keyType].Add(transition);
}
We'll also need modify our InitializeStates method to setup these transitions. We'll first need to use our AddTransition method we created to add the transitions. Secondly we'll need to set a “Default” state which will just be us setting currentState to a state of our choice.
The following code will vary a little bit if you differed from the states created earlier and will be based on which states you want to be able to transition to and from. The ‘...’ notation will mark points where code has not changed and can be left as is.
private void InitializeStates()
{
    ... // initialization

    AddTransition(idleState, tiredState, () => Input.GetMouseButtonDown(0));
    AddTransition(idleState, hungryState, () => Input.GetMouseButtonDown(1));

    AddTransition(tiredState, sleepingState, () => Input.GetMouseButtonDown(0));
    AddTransition(tiredState, idleState, () => Input.GetMouseButtonDown(1));

    AddTransition(hungryState, idleState, () => Input.GetMouseButtonDown(0));

    ... // loop

    currentState = idleState;
}
Time For Some Visualization!
So let's take a moment to go over everything we've done so far to really get an understanding of what exactly is going on here.
First off let's break down the AddTransition method that we're calling. The first state passed in is the state we would be currently in. Let's take the first line as an example…
AddTransition(idleState, tiredState, () => Input.GetMouseButtonDown(0));
If our Person is currently in the IdleState, we will allow them to transition to the TiredState if we press the left mouse button. Otherwise if we press the right mouse button, we will transition to the HungryState instead. Not pressing anything keeps us in the IdleState.
One of my favourite ways to visualize these trees is with a flow chart. I'll be representing left mouse button with “0” and right mouse button with “1”. This image will visualize the graph I've created above, feel free to make your own!
Looks like the flow of events for my life. -Oliver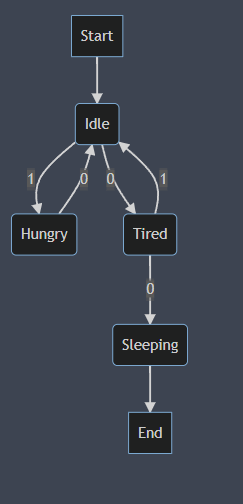
After looking at it for a little while you might start to notice a few things. Let's go over some of the more interesting parts and see what information they have.
- We have a Start and End state in the chart but not in our code. We could have a Start and End state, however it's not needed here.
- Sleeping is the only state which reaches end. This means that the Sleeping state is the only true “End” or “Dead” state in this tree. If we ever enter this state we can't go back! As an example, you can replace this with a dead state for an enemy.
- Hungry State and Sleeping both ignore right mouse press. This is true! And totally valid, if we were to get a button press while in these states we'd simply ignore it.
The Last Gears in the Machine…
Now I did mention that I would avoid optimizations for the most part, however we're going to make one pre-emptive optimization. This will not only make our job a little easier later but it will make things feel cleaner.
Head to the top of the Person script and add the following code just below our allTransitions dictionary.
private List currentTransitions = new List(6);
Next head to our previously cleared and abandoned Update method and add the following code.
private void Update()
{
    if (!Input.anyKeyDown)
        return; // if we have no input, no need to check

    // does this state have any transitions?
    if (allTransitions.TryGetValue(currentState.GetType(), out currentTransitions))
    {
        for (int i = 0; i < currentTransitions.Count; i++)
        {
            // if the condition hasnt been met, return
            if (!currentTransitions[i].ConditionMet())
                continue;

            // condition was met! set new currentState
            currentState = currentTransitions[i].NextState;
            break;
        }
    }

    // can be replaced with an Update method
    currentState.Respond();
}
This code may be pretty simple but let's break it down anyways.
- Check if we have any input. We can return if not since our transitions are input based.
- Check if we have any states we can transition to.
- Yes? Iterate through the list and confirm that a condition is met.
- No? Set the current state to that state.
Setting up our code this way also gives the added benefit that we can check our state but not transition by pressing a key that isn't the mouse button!
The Machine Lives!
With that, you have now successfully created a basic but re-usable state machine! Now you have a bit more understanding of how Finite State Machines work and the structure behind them as well. But let's dig a little and try and understand exactly what benefits this design pattern brings.
The first real benefit this design pattern brings is code cleanliness. With a little extra overhead we've saved ourselves dozens, if not possibly hundreds of if statements. The code is also far more readable, at a glance we can quickly see how exactly our structure is laid out. With further optimizations and abstraction it's possible to make it even easier to understand!
The second benefit is code re-usability. As always we want to make as little work for ourselves when writing code. The problem that typically occurs is that often much of the code we need is completely re-usable but ends up being re-written over and over.
For example, with 100 NPC characters you may only have 5-10 different idling behaviours. However without a re-usable structure you may just end up copy and pasting the same code, or very similar code over and over.
With the state pattern this isn't an issue, you can easily re-use previous states you've written just by creating a new instance of the state. This allows you for much more flexibility and it's super easy to mix and match in comparison to other methods!
The third benefit is making a system which can be completely automated. With a simple update loop and some logic, this system can become completely independent. This makes it one less thing you have to constantly manage and a perfect fit for things which interact with your world. However by giving too much independence it can become difficult to debug so balance is key.
A Post-Mortem
This system was designed for demonstration purposes, as such it's not entirely ready to be shipped to your platform of choice. So now it's time to go over a few issues with this current design and some things you can work on improving in the future.
Limitations within the editor. This is a glaring problem in Unity for a lot of polymorphic and abstract systems. This system is no exception to this unfortunately. If you don't want to dive into serialization and editor scripting I would suggest picking up Odin Inspector. This will make it much easier to debug, manage and keep the system user / designer friendly.
Debugging Limitations. As I hinted at above, debugging these kinds of automated systems can be a pain. Visualization and debugging tools as well as planning are key to the success of these systems. One of the key factors that really makes these necessary is abstraction. As you abstract your system further to make it more robust and re-usable, you will slowly introduce debugging limitations. Be sure to stay on top of your debugging or it'll catch up quick!
Performance issues. That's right, performance issues. Though, you might not encounter them right away, these kinds of systems which are entirely object based tend to be performance pits. Always keep an eye on your garbage collection and CPU/Memory usage. Some things you can do to reduce strain are…
- Doing resource intense operations asynchronously
- Updating the state machines on a fixed cycle
- Staggering update calls between instances so not all instances update at once
The Gears Come To A Halt
With that this guide is now finished! So what are you waiting for? Oh I guess I should probably wrap this up.
Congratulations on managing to make it through this guide! You've now started on a journey towards better code and code structure. Your future self will thank you for it.
Now go out there and get those gears turning, let your state machine breathe life!
~ A madman's guide to State Machines