To follow along wtih this guide, you will need to have read part 2.
You may have heard the terms TCP and UDP. What exactly do they mean?
When we create a socket to send and receive data, we have a number of different types of sockets that we can create. The two most common types are ones that use, as one might assume, the TCP protocol and the UDP protocol.
TCP vs UDP
These two protocols work in very different ways. TCP - short for Transmission Control Protocol - is what we want to use when we want our data to arrive in tact, in order, without degradation or loss. Most of the time when writing networked applications, this is the protocol we want to use. TCP ensures that whatever data the server sends, the client will receive verbatim, and vice versa. It does this by constantly checking with the other end if the data arrived and verifying that it did indeed arrive correctly. This exchange can seem slow an inefficient, but pretty much every modern system and internet connection can deal with this so quickly, the delay is virtually imperceptible.
UDP - short for User Datagram Protocol - is a protocol which just sends bulk amounts of data to the other end without any care in the world. It has no verification, it doesn't confirm that the other end received the data in order (or even at all). This might seem impractical, but it's ideal for things like voice chat, video chat, and streaming services. Some data can arrive malformed, some data can be lost entirely, but it's fine if most of the data arrives in one piece. If you've ever been in a voice call and the other person drops out or their webcam/screen share hangs and freezes for a second, this is very likely why. These things are usually sent over UDP which can handle the large amount of data efficiently, but not always effectively. To paraphrase Tom Scott, it's essentially pointing a fire-hose of data and letting it rip, like saying “I DON'T CARE, HERE IS DATA, JUST HANDLE IT!”
The difference between these two most common protocols is so well known in the industry that you may have heard the jokes:
A: "Hi, I'd like to hear a TCP joke."
B: "Hello, would you like to hear a TCP joke?"
A: "Yes, I'd like to hear a TCP joke."
B: "OK, I'll tell you a TCP joke."
A: "Ok, I will hear a TCP joke."
B: "Are you ready to hear a TCP joke?"
A: "Yes, I am ready to hear a TCP joke."
B: "Ok, I am about to send the TCP joke. It will last 10 seconds, it has two characters, it does not have a setting, it ends with a punchline."
A: "Ok, I am ready to get your TCP joke that will last 10 seconds, has two characters, does not have an explicit setting, and ends with a punchline."
B: “I'm sorry, your connection has timed out. Hello, would you like to hear a TCP joke?”
And of course:
I'd tell you a joke about UDP, but you might not get it.
A note on rUDP
If you've tried your hand at networking in the past, you may have stumbled upon a protocol known as rUDP - short for “Reliable” UDP. In a nutshell, this protocol aims to offer the same level of error-correction and reliability of TCP while also taking advantage of the efficiency of UDP. This can be desirable for fast-paced networked applications like multiplayer games. You absolutely would not want to use UDP to send player position data for example (especially in competitive games where player position synchronisation is the most important aspect), but you may also be hesitant to use TCP due to the overhead it introduces. rUDP aims to bridge this gap and alleviate both of these concerns.
However, I personally disagree with this concept wholeheartedly. In my opinion, this is reinventing the wheel of TCP which already offers such reliability, while suffering no perceptible performance loss. I do encourage you to read up on rUDP, and maybe even utilise it in your own projects, but this is not something I will be covering in this guide. We're primarily going to be focusing on TCP (and maybe some UDP if it comes to it).
Initial setup
When creating a TCP socket, we're able to utilise the now-familiar construct of streams when reading data from, and writing data to, the receiving end.
Before we get to the code however, Windows users do have an additional step needed to follow along with this guide. So if you're on Windows, expand the section below before continuing on. If you're on Linux or macOS, you can skip them.
- Open the Start menu and search for “Turn Windows features on or off”
You can do this via Control Panel too, but this way is easier.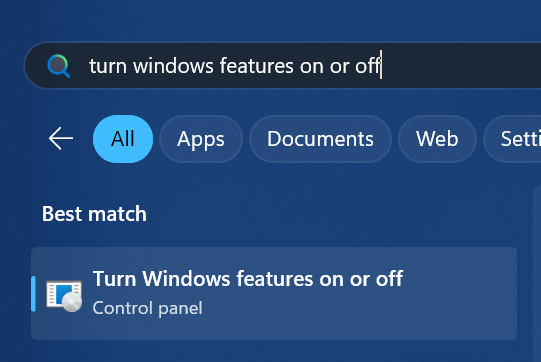
- Scroll down until you find Telnet Client. Make sure it is checked. By default it isn't
It's disabled by default because we should be using SSH these days.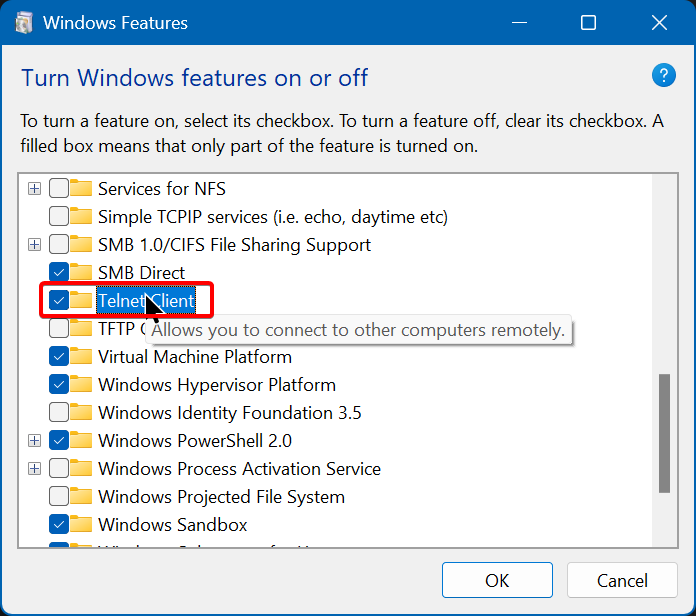
Hit OK to apply your changes
You'll need to reboot your system for the changes to take effect, so go do that before reading onward
Now we're going to make a new empty console project and create our very first socket! From this point on I will always refer to the native function we need to perform the operation we want, as well as the C# version we'll actually be writing (obviously). Me doing this allows you to look up the native documentation, as well as find the equivalent wrapped function in whatever language you happen to be using. So without further ado…
Creating a socket
The native function to create a socket is, quite unsurprisingly, the socket function (man page, Winsock docs). This function gives us a handle to the socket which we need to keep around, so that we can do things with it later. In .NET, this comes in the form of the Socket class, specifically the constructor.
The overload of the constructor we want will accept the SocketType and the ProtocolType. Since we want a TCP socket, the protocol type will be ProtocolType.Tcp, which aligns with the native macro IPPROTO_TCP. TCP sockets work with a stream, so we'll be using SocketType.Stream for the socket type, which maps to the macro SOCK_STREAM.
There is another overload which we may need at some point which accepts an AddressFamily. By default, .NET will determine the address family for you based on what your system can support. If your operating system supports IPv6, it will pass AddressFamily.InterNetworkV6 (which aligns with the macro AF_INET6). Otherwise, it will pass AddressFamily.InterNetwork (AF_INET). Those in other languages/frameworks may need to specify this value explicitly. This is where you make a choice. If you wish to support IPv6 clients down the road, you'll want to use the IPv6 family! In fact since my operating system supports it, that's the value that .NET will pass for me anyway. Most modern applications should be using it, and it still supports IPv4 clients too, so there is no real downside to passing AF_INET6. Just know that while you won't see it in my code examples below, that is the value being used.
With that explained, let's call the constructor and create a socket!
using System.Net.Sockets;

var socket = new Socket(<mark>SocketType.Stream</mark>, <mark>ProtocolType.Tcp</mark>);

// ...

socket.Close();
It's important that we call the Close method afterwards, as creating a new socket involves native allocations that must be freed up. This method wraps the native functions close on Linux (man page), and closesocket on Windows (Winsock docs).
Note
If you're developing in native code on Windows, you'll need to perform additional initialisation before calling the socket function. See the steps below for more information.
Before calling socket, you'll need to call WSAStartup to initialise the Windows implementation of “Windows Sockets” also known as “Winsock”.
This function accepts a version identifier as well as a reference to a WSADATA structure which gets populated that can, for the most part, be discarded immediately.
For the version, you can pass the result of the MAKEWORD macro with the low and high bytes both set to 2, i.e. MAKEWORD(2, 2). Alternatively you can just pass the constant 514, which is the same thing.
Once all socket operations have completed and the networking is done, also be sure to call WSACleanup to free up the allocations created by Winsock.
An example of how this might look in C is:
#include <Winsock.h>

int main(void)
{
    WSADATA wsaData;
    WSAStartup(MAKEWORD(2, 2), &wsaData); // or WSAStartup(514, &wsaData);
    SOCKET sockfd = socket(AF_INET, SOCK_STREAM, IPPROTO_TCP);

    // ...

    closesocket(sockfd);
    WSACleanup();
    return 0;
}
But I'm sure you're well aware of the various “quirks” that make Windows development an absolute ballache. This is just more to add to the pile.
Now we get to decide how this socket behaves. Will it be a server or a client?
Since we're creating a server, we need to first bind the socket to an address. This functionality allows us to limit what adaptors our socket is listening on. For example if your computer has both an ethernet connection, and a WiFi connection, it's possible to “bind” to just one of these and only listen for connections on that one adaptor.
In most cases, especially for our purposes, we don't particularly care which adaptor is receiving the traffic. We want to be able to listen on whatever adaptor is in use. Fortunately there is an IP address for such a purpose called the “any” address. The IPv4 version is 0.0.0.0, and the IPv6 version is ::. Binding a socket to these addresses will have it allow connections from any location - hence the name the “any” address.
So how do we bind? Well, the native function for this is unremarkably called bind (man page, Winsock docs) and in .NET we use the socket's Bind method. These native functions accept a pointer to a structure named sockaddr (man page, Winsock docs), but again in .NET we have a moderately simpler API in the form of the EndPoint class.
We can't instantiate this class though, because it's abstract. There are, however, three concrete implementations of it called IPEndPoint, DnsEndPoint, and UnixDomainSocketEndPoint. For now we already know the IP address we want (the any address) so we can use IPEndPoint.
Okay, so the IPEndPoint constructor wants an IPAddress as well as a port number. Let's explain the port first.
The port number
The port, also known as the “service name”, is simply a unique number that functions as a way to differentiate between various server applications running on one machine. It would obviously suck if you could only ever run one server on your machine, wouldn't it?
PC: "Oh you want to run a website?"
You: "Yes please!"
PC: "That's fine! Say goodbye to your ability to host a Minecraft server."
You: "Wait, but…"
PC: “Byyeeeee!”
To work around the fact that one machine will almost certainly be running multiple server applications (a webserver, mail server, database, FTP, etc.) we make use of a port number which essentially allows a connecting client to say “Hey so I want this machine over here, and I specifically want to talk to this one application as well.”
This port number can be any value from 1 to 65535, but some common default port numbers you may or may not have heard of are:
- 80 for HTTP
- 443 for HTTPS
- 21 for FTP
- 22 for SSH
- 25565 for Minecraft
69 for your mother
There is no strict rule about these services running on these specific ports. You can in fact run a Minecraft server on port 80, and you could run a private Unreal Tournament lobby on port 25565. These numbers are nothing more than convention, and are generally the defaults that a client will use when you don't specify one explicitly.
We're going to use port 12345 for the purposes of this guide. Again this value means nothing in particular, we just need a way to differentiate our application from any others. This also removes the problem that Linux users have where the system prevents non-root users from binding to a port below 1024, as some of the most common ports are below this range and generally should only be tampered with by the system administrator.
That leaves one other argument.
The IPAddress
I'm sure I don't need to explain to you what an IP address is. The real question is how do we create an instance of the IPAddress class, and more importantly how do we set it to the “any” address?
One solution might be to use the Parse or TryParse methods, giving it the string "0.0.0.0". While this would technically work, it's ultimately a waste of time and computation. The any address is so commonly used that a predefined IPAddress already exists for this purpose! It's the static Any field. This is what we'll be using throughout the majority of this guide.
Starting a listener
That was a lot of information I know. But now that we know what IPAddress to use, and what port to use, we can construct our IPEndPoint and pass that to the Bind method mentioned earlier.
<mark>using System.Net;</mark>
using System.Net.Sockets;

var socket = new Socket(SocketType.Stream, ProtocolType.Tcp);
<mark>var endpoint = new IPEndPoint(IPAddress.Any, 12345);</mark>
<mark>socket.Bind(endpoint);</mark>

// ...
socket.Close();
At this point though, the socket doesn't actually listen for incoming connections. All we've done is bind the socket to an address. At this stage, if you attempt to bind to an endpoint already in use (for example you are already running a webserver on port 80 and you tried to bind to port 80 yourself), you'd hit an exception. Only one application can bind to a given endpoint at any one time. This is the reason we chose the port 12345 at all, since it's highly unlikely that will actually be in use by anything you're running right now.
To actually start listening for connections, we need to call the listen function (man page, Winsock docs) which maps to the Listen method in .NET. This function accepts a parameter for the backlog, however in .NET the method has an overload which lets you not pass it. Not all languages have this, so you might be wondering what value to pass as the backlog.
The backlog parameter indicates how many pending connections the socket should be allowed to queue. This is capped to the maximum number determined by the operating system, and this is where the .NET developers made a goof.
The overload that does not accept a backlog will pass int.MaxValue (2147483647) for you. On Windows, this aligns with the native macro SOMAXCONN of the same value because this value has a special meaning. 2147483647 instructs the Windows Socket (Winsock) service to determine a reasonable backlog automatically. However on Linux, SOMAXCONN is defined to be 4096, as this is the default value found in /proc/sys/net/core/somaxconn. Linux will silently cap any value above the maximum defined in that file. This means that even though .NET is cross-platform, and the same code is supposed to run the same everywhere, it actually doesn't and the behaviour differs between Windows and Linux.
Because of this, I always find it a good idea to explicitly set your own reasonable backlog to something small. 5 is more than enough, but we might want 100 if we had a large scale application. In this guide, we'll just use 5:
socket.Listen(<mark>5</mark>);
Now the socket is in a listening state! Connections will be able to queue up now, though you won't be able to connect. Since the listen function is not a blocking one, that allows the code to carry on. With nothing left to execute our program will close and the socket which was just created will be destroyed immediately.
We're now at the point where we can start to accept connections.
Accepting a connection
Can you find the function which accepts incoming connections?
That's right!
Say it with me, the accept function! (man page, Winsock docs). In .NET, it's the Accept method. Once the socket has been placed in a listening state, this function can be used to grab a handle to a new socket. Specifically the next client that connected. We don't need to give it any additional arguments either.
Socket client = socket.Accept();
Now that we have a handle to the client we're able to send some data. The native function for this is send (man page, Winsock docs), given to us in .NET as the Send method.
This function accepts a block of bytes, a length to indicate how many bytes it should send, and a “flags” parameter. The flags parameter allows us to fine-tune the control of how data is sent, but for now we don't actually care about that. We simply pass SocketFlags.None (equivalent to just 0) and call it a day.
So let's allocate a block of memory for our data, tell it how many bytes there are, and send it to the client! After that we'll be sure to close their connection as mentioned above:
byte[] data = [72, 101, 108, 108, 111, 32, 87, 111, 114, 108, 100, 10];
client.Send(data, 12, SocketFlags.None);

client.Close();
These bytes correspond to some ASCII values. I'm not going to spoil what these values are but if you recognise it, good job! For the sake of testing however, let's run the program and see what happens.
You'll see that the program does launch, but it appears to be hanging. This is because the accept function is a “blocking function”. This means that the current thread is on hold waiting for the function to return. Which it won't, not until we actually connect to the server. Then how do we do that?
A fast and easy way to connect to some remote server is by using a tool known as Telnet. On Windows, Telnet needs to be enabled manually. The steps for this I already outlined above so if you skipped them - go read them now. On Linux this tool is available already so no additional steps are necessary.
Open up a new terminal/console window and run the following command:
telnet localhost 12345
When you do this, Telnet will launch and open up a connection to the address and port you specify. Since our server is running on the same machine, we use localhost as the host. The port number should match whatever port you wrote in your code - for me that's 12345.
If all goes well you should see a connection attempt, followed by the console clearing and printing the following output:
Hello World

Connection to host lost
We see the famous Hello World, followed by a loss of connection. The reason it lost connection is because once the data was written to the stream, the server had finished executing all of its code and terminated. This caused the client to be disconnected and so we get the result we saw.
Linux users will see something slightly different. Your terminals won't clear the screen, and you'll also see some additional trace logging, but your “Hello World” will still appear:
[32muser@desktop[0m:[34m~[0m$ telnet localhost 12345
Trying 127.0.0.1...
Connected to localhost.
Escape character is '^]'.
<mark>Hello World</mark>
Connection closed by foreign host.
[32muser@desktop[0m:[34m~[0m$ █
Using a simpler API in .NET
At this point we're ready to learn about a class which will come in handy throughout this process. We're going to explore the NetworkStream class, which encapsulates a socket into a Stream. Since we've covered streams in part 2, namely MemoryStream and FileStream, this should be a painless endeavour. The NetworkStream constructor accepts the Socket we want to interact with. Except this time instead of calling Read, we're going to call Write, which accepts a block of bytes to write.
Let's write up the code we need to send some data:
Socket client = socket.Accept();
<mark>var stream = new NetworkStream(client);</mark>

byte[] data = [72, 101, 108, 108, 111, 32, 87, 111, 114, 108, 100, 10];
stream.Write(data);

client.Close();
One more important thing we need to do to see results is to call the Flush method. When data get written to a stream, they don't get written immediately. Instead they're buffered. This helps you to assemble the data you want to write, before actually performing any writing operations. It would be quite the strain on our disk if we were writing to a file for example, and the Write method were to write every single byte separately. Instead we queue up the data to say “These are the values I'd like to write” before finally calling Flush to say “Okay, now go ahead and actually write them.” So we must always remember to call the Flush method when we've finished writing the data. This ensures it all actually gets sent to the stream.
using Socket client = socket.Accept();
using var stream = new NetworkStream(client);</mark>

byte[] data = [72, 101, 108, 108, 111, 32, 87, 111, 114, 108, 100, 10];
stream.Write(data);
<mark>stream.Flush()</mark>
Run the server and connect with Telnet again and it should behave exactly as before, printing Hello World to the Telnet client. If you missed a step, here is the complete code:
using System.Net;
using System.Net.Sockets;

var socket = new Socket(SocketType.Stream, ProtocolType.Tcp);
var endpoint = new IPEndPoint(IPAddress.Any, 12345);
socket.Bind(endpoint);
socket.Listen(5);

Socket client = socket.Accept();
var stream = new NetworkStream(client);

byte[] data = [72, 101, 108, 108, 111, 32, 87, 111, 114, 108, 100, 10];
stream.Write(data);
stream.Flush();

client.Close();
socket.Close();
We have now laid the foundations for the next part of this tutorial. We're going to create a server which listens for data from the client, and simply sends it back to the client. This is known as an echo server and serves as a way to test networking code, as well as ensure that your internet connection is stable.